Pages

Sunday, June 29, 2014

Etude House It's Real Pack (Carrot): Review


Before I go on with the formal content of this post, I would like to invite everyone to join my ongoing giveaway. I will be giving away a hair dye from the Japanese brand called Dariya Palty in the shade Milk Tea Brown, which happens to be one of the popular shades they have. It is open internationally so everyone is encouraged to join. :) (You will probably see this introduction in most of my future posts up until the giveaway is over. I hope you don't mind the post by post plug. ^^)


So you would think after I made all the fuss about the general post regarding face masks and face packs, my posts regarding these kinds of products would lessen but here I am with, yet again, another face pack post. This one is from the Korean brand called Etude House It's Real Pack (Carrot): Brightening Care.
To be honest, the after result isn't anything exciting as one would expect. The container did say brightening but it didn't really do much of that, in my opinion. I actually didn't want to create a separate post about this but I did mention (in the post linked above) that if there was something different about a mask/pack I've tried, then I will be doing a separate post on it. To keep my word, I am now in front of my laptop typing a blog post.

So let me tell you more about the product. As stated, the end result wasn't really anything new. It left my skin soft and moisturized but it didn't stay true to its claim, which is (supposedly) to brighten complexion. One reason I can think of is because I only have one of this face packs (It was a freebie from an online purchase. I really want to give my thanks to the seller but I forgot which seller gave me this. But dear seller, if you are reading this, please send me a message so I can at least link you here.  ^^) so I was only able to use it once. Maybe you have to use it regularly to see brightening results, but frankly, who am I to conclude that? I can only vouch for its immediate results since as I've said, I was only able to use it once.


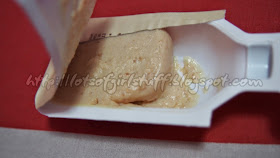
What's different about this product, though, is its thickness and consistency. I've tried many wash off face packs before and this is by far the thickest type I've ever used. It's very creamy, almost chunky with a little bit of an oatmeal feel and because of this, it is pretty hard to wash off after 20 minutes. Nevertheless, I didn't hate the product. On the other hand, I also wasn't particularly fond of the item.

To sum it all up, my thoughts on this product are just so-so. It didn't strike as a must-have skin care item for me so I guess it's safe to say that I wouldn't be buying myself one of these (I'm not even sure if it's still in the market) in the future. Although, if given the chance, I wouldn't pass on trying it out if I didn't have to pay for it. In short, I think it is an okay product but not worth shelling out money for.
with love, Anna Luisa

Friday, June 27, 2014

AOA Short Hair MV Makeup | 에이오에이 - 단발머리 메이크업


Before I go on with the formal content of this post, I would like to invite everyone to join my ongoing giveaway. I will be giving away a hair dye from the Japanese brand called Dariya Palty in the shade Milk Tea Brown, which happens to be one of the popular shades they have. It is open internationally so everyone is encouraged to join. :) (You will probably see this introduction in most of my future posts up until the giveaway is over. I hope you don't mind the post by post plug. ^^)


Here's a little bit of an update on what's new in my youtube channel. I just published a video earlier today with a simple makeup tutorial inspired by one of K-Pop's (not so) new girl group from FNC Entertainment (Yes, think C.N.Blue, F.T.Island and Juniel!), AOA or Ace of Angels. They recently released a new music video called Short Hair. It's an upbeat catchy song that I like to listen to on repeat. I like how cute and colorful the whole music video, which finally urged me to do a makeup look inspired by it.

https://www.youtube.com/watch?v=zTU0rLoIbv8
(Click on the photo for the tutorial) 

I was mainly looking at Hye Jung's makeup and that was the look I was going for but somehow, after publishing it, a viewer commented that it looks more like Seolhyun's, which I happen to agree with. I'm not sure but whenever I try to recreate K-Pop looks, it doesn't really look exactly the same (probably) because my eye shape is different than those of Korean stars.


 Expectation: Hyejeong makeup
 Reality: Resulted as Seolhyun (Doesn't matter though, because both are pretty. ^^)

Anyway, it took me a longer period of time filming and editing this particular tutorial because I wanted the output to be an improved version of my previous uploads. I managed to get some new filming ideas thanks to ClairBellaTV, as she shared a few filming tips in her latest main channel video. So I give her all the credits for the better outcome of my videos from hereon. Yay!

Anyway, check out the fruits of my hardwork, the video itself, over HERE. Thanks!
with love, Anna Luisa

Wednesday, June 25, 2014

Ever Bilena Matte Lipstick in Viva: Review


Before I go on with the formal content of this post, I would like to invite everyone to join my ongoing giveaway. I will be giving away a hair dye from the Japanese brand called Dariya Palty in the shade Milk Tea Brown, which happens to be one of the popular shades they have. It is open internationally so everyone is encouraged to join. :) (You will probably see this introduction in most of my future posts up until the giveaway is over. I hope you don't mind the post by post plug. ^^)


 The shade is depicted on the cap so you don't have to do some guesswork.


So enough about my giveaway plug. Here's to the real deal! Ever Bilena matte lipstick has been in the market for years now and many Filipina beauty bloggers have already professed their love for this product. I wasn't much of a matte finish fan but since many people are swearing by this product, I decided to join the craze. A little too late, you might say. Well, this is actually not the first time I've tried this particular product. It was two years ago when I convinced myself to buy one. I got the shade Mauvey for its nice nude pink color. I was pretty satisfied with my purchase but I never got to review it.

Swatch taken with my old camera

A year ago, however, I decided to buy another one from the same line, but a different color. I chose Viva. Viva is a nice everyday pink color. With one swipe, it looks very natural, perfect for those days when you just want to look sweet and simple. It is buildable, though, to a brighter finish for when you want to make a subtle pop of color on your lips.


True to its name, it sets matte. This can either be a good or bad thing, depending on how you like your lips to be. As I've said, I'm not really a fan of matte finish lipsticks but it doesn't really matter to me because I can easily just top it off with a gloss if I want to.

On the other hand, something that bothers me is that it leaves my lips 'too dry' if I don't prep properly. To solve this, I always make it a point to apply lip balm prior to applying this product. It also doesn't have a long staying power but I really don't expect it to be at only PHP155.

In my opinion, I don't really see this as a product that I would rave about but rather a product that delivers to its expectations. I wouldn't necessarily recommend this as a must-have but I would say it's something that's nice to try. However, if you have an extra PHP155 in your wallet (or purse... or wherever you keep your money) and there's a Watsons store (or any other major department store) near you, then I don't see any reason why you shouldn't buy it. It has a wide selection of colors so I'm pretty sure you will get one that fits your style.

This particular product is a part of my Top 5 Summer/ Spring 2014 Lip Colors. Be sure to check out the other 4 in this post.
with love, Anna Luisa

Monday, June 23, 2014

Palty Hair Dye Giveaway!

Hi everyone! For old subscribers/ followers, you might have heard of this at least once or twice from my uploads/posts and you may have been waiting for this for quite a while now. Fret no more, my giveaway is now up and running! For new subscribers/ followers, welcome! Feel free to join the giveaway for a chance to win a Palty Foam Hair Dye in Milk Tea Brown.


For those who are curious about the product, I've posted a review on a similar product (but different shade) in this blog and you can check it out over here. I chose a different shade for the giveaway, particularly Milk Tea Brown, because that's my current hair color as of the moment (only it was colored with a different brand- Prettia). ^^

This giveaway is open internationally so everyone is elligible to join. You will be winning the Palty Foam Hair Dye (Milk Tea Brown) and the Palty Tsubaki Camellia Hair Oil Treatment. Along with these, there are also freebies (cape/ cap) that you can use when you color your hair.


This will be running through rafflecopter so you will have to enter through the rafflecopter below. Note that you DON'T have to do all the entries. The only thing I would require of you is to either subscribe to my youtube channel or follow my blog. If you do at least one of these, then you're good to go. You can, however, do all the tasks to earn more entries and increase your chances of winning. NO GIVEAWAY ACCOUNTS.

a Rafflecopter giveaway


I will be contacting the winner and announce the winners through my social media (facebook, twitter, instagram), a blog post and through youtube. The chosen winner must respond within 3 days or I will choose another one.

I would also love to hear from you. This is of course, not required. But let me know what you like in my blog/channel and what content you would like to be featured more in them (my social media included) by commenting down below. Thank you!

with love, Anna Luisa

Saturday, June 21, 2014

THEFACESHOP Clean Face Clear Away Spot (Cystic Acne Remedy): Review


You would think nothing's worse than pimples. Four years ago, I used to think the same. Up until I faced one of the most disgusting and most painful skin problems of all-- cystic acne! Yes, it is similar to pimples, clogged pores and inflammed with redness that screams "Look at me!". But while pimples scream at 80 decibels, cystic acne shouts at 100 decibels! It obviously has deeper roots and it definitely is (always) much more painful. As if all that isn't enough to drive you insane, it is also harder to treat. Good thing I came across THEFACESHOP Clear Away Spot!

 Top view. Just because I feel more creative, taking one. Hehe.
 When the instructions say, "DO NOT SHAKE!" in upper case letters, you know they're seriously asking you not to.
 Active ingredient: Tea Tree Extracts
 It's a cute little bottle of miracle!

Before I continue, I would just like to clarify one thing. I'm no skin expert. Yes, I have a background around health but my skills are mostly critical care nursing and I don't have enough knowledge about dermatology for me to be considered an expert. I am, however, very experienced with this topic as I have been struggling with the problem (on and off) for almost four years now.

The main problem, in my opinion, is the nature of cystic acne. It is deeper within the skin that is why topical creams don't reach them (I think). I used to think that the only solution to this is pimple injections from time to time whenever I get my monthly facial. I get mine from Skin 101 SM Muntinlupa. They do the job pretty well as acne will significantly decrease in size in a matter of hours. The problem, however, is maintenance. Honestly, I don't have the time and money to go get a facial at a two week interval so it really is hard to deal with cystic acne, especially when it forms just days after the facial. But now, I know better. And because I want you to be happy like I am, I would love to share a solution to this problem.

I first got a bottle of this product through Kkochipida for only PHP 300+ when it was on sale early last year. I didn't expect much as I've always had sensitive skin and I really didn't know much about the product. Nevertheless, I still purchased the item out of curiosity. I'm glad I did!

You don't mix it because you aim to get the powder below the solution.

THEFACESHOP Clear Away Spot from their Clean Face line is in the form of pink powder. I'm pretty sure you've seen a product similar to this. One famous product would have to be the Mario Badescu's Drying Lotion but Etude House and Nature Republic also carry a similar product. I've never tried the other ones, though. This is because I'm super satisfied with the one I already have.

As the name suggests, it is a spot treatment. If you keep the bottle still (Don't shake it! I'm not even kidding.), the pink powder will settle at the bottom of the bottle. You then dip a q-tip and get an ample amount of product to your liking. You then apply it on your spots. You can apply it over your cystic acne or on normal zits. The liquid evaporates and the powder sticks to the spot where you placed it. Some say this product dehydrates that spot, reducing inflammation within the area. I'm not entirely sure about this fact but one thing's for sure-- it really does shrink zits fast!

I usually use this at night as I don't really want pink dots all over my face during the day. I sleep on it and magically, all my zits appear smaller when I wake up! It doesn't matter if the zit is so big, that it can already be considered as my secondary chin. Once I apply this product, I am confident that I will see improvements the next day.

With small pimples, it dries up fast. With cystic acne, I notice that it brings the acne out on the surface then dries it out in a few days, if you know what I mean. It also helps in lessening the pain from the inflammation.

This is my holy grail spot treatment and I've never seen any other product work better than this. I am currently on my second bottle, which I purchased from THEFACESHOP boutique in Festival Mall Alabang. I will definitely buy another one once this runs out. So if you have cystic acne problems like me, then I suggest you try this one out. The price is reasonable at PHP595 at THEFACESHOP Philippines boutiques. If you don't have one near you, you can definitely order from Ms. Charm of Kkochipida!
with love, Anna Luisa

Thursday, June 19, 2014

Beginner Nail Art (Leopard Print) featuring THEFACESHOP, Caronia


I've never been an expert at nail art. I mean, some of my friends like the way I do my nails (at times) but I think that's only because only a few people in my circle sport the same thing unless of course it was done professionally where nobody but the nail artist gets the credit. Otherwise, DIY nail arts seem to be quite amazing for them. And I feel the same way too! DIY nail arts are amazing. With a creative mind, you can glam up your nails with different designs for different occasions. Sadly for me, though, only my imagination is creative. My hands/fingers can't seem to keep up with the designs I have in mind so I always end up messing up a nail design.

Two weeks ago, however, I decided to look through beginner nail art tutorials in youtube and I found one with leopard prints. To be honest, I want to link the specific video where I learned it from but there are so many leopard nail arts out there in youtube that it somehow got lost in the pile. But anyway, I was afraid of doing it on my own as it may look weird but thankfully, it didn't. Here's the finished design. I only had it in a couple of nails because I'm lazy like that. :p

 It doesn't look perfect but I'm quite proud of it. :)

I used different nail polish colors (as you can see) and I would like to take this opportunity to share them with you just so you have an idea of the swatches. I can't find the black nail polish I used for this so it's not pictured below. But I believe it is from the brand called Sassy Colors.


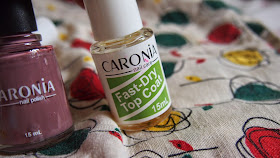
 Caronia Nail Hardener and Base Coat
 THEFACESHOP Nail Polish in GR501 (Thanks Lyle!): Leopard Details
 THEFACESHOP Nail Polish in PP401. (Thanks Iris!): Middle and Pinky Finger
 Caronia Regular Nail Polish in Pink Lilac: Design Base Color
Caronia Fast Dry Top Coat

That's all for now! If you have any easy nail art suggestions, please comment down below and I will try to have a go at it. Thanks!

with love, Anna Luisa

Tuesday, June 17, 2014

Etude House Proof 10 Eye Primer: Review


Eyeshadow isn't necessarily something that must always be present in a make-up look. Although I happen to apply eyeshadow almost always whenever I go out (to fully use my collection before it expires), I still don't think everyone must wear it every single time. There is one thing that's a necessity, though, when you choose to apply eyeshadow... and that is choosing a good eyeshadow base. Today, I will be sharing with you my most favorite item that I use under almost all my eyeshadows which is the Etude House Proof 10 Eye Primer.


I hope you can read it well as this photo was taken using my old camera.

I like to apply this because I gain a lot of benefits from it. For one, blending my eyeshadows, whether they're high end or drugstore, comes a lot easier when this is applied beforehand. Also, I have naturally oily lids so it's always a struggle to keep the eyeshadow in place without creasing throughout the day. With this product, as long as I stay in a well ventilated area, my eye shadow stay fresh all day long without creasing/ clumping in the eye folds. The vibrancy of the colors also show a lot better and it lasts longer too. That is why I almost always use this whenever I go out, whether it is just for a casual or a formal event.

I haven't tried much eyeshadow bases before but I did try the two eye primers from ELF (liquid and stick) and a base from NYC and this happens to be the best out of the three. I mean, they all work the same but Etude House beats them a little bit in several aspects such as vibrancy, longevity and performance (blendability/ oil control). It also goes a long way as I have been using the same item for about 6 months now and I still have some left!

I even use it even if I'm not wearing eyeshadow as primer for my eyeliner and I believe it also contributes to better eyeliner performance.

TIP: Don't wait a long time before blending the product as it will set and become hard to blend. What I do is I apply it to one eye first, blend it, then I work on the other eye.

I got this from an Etude House counter in SM Makati (Watsons). It's quite affordable at the price of PHP 298. For more info, feel free to visit the Etude House Philippines Facebook Page.

I would definitely grab another one once this runs out as this is my current holy grail eye primer! Make sure you grab one too!


with love, Anna Luisa